The Concrete Raising template allows you to easily calculate the cost of your work by simply entering the dimensions of the area to be worked on.
Setting up the Add On
Use Settings > Add ons to control what default options will be available when estimating. These will show every time you create a line item using the Concrete Section Item Add on.

1.) Name - This will be how this Section is displayed on every estimate.
2.) Conversion - This is the conversion factor into cubic yards:
-
Mudjackingis typically estimated in cubic yards.
- One load of a VersaPump is 7.5 cubic feet or .277 cubic yards
- One load of a Power Pump is 5 cubic feet or .185 cubic yards
-
Polyurethaneneeds a conversion factor to tell the system how many lbs will create a cubic yard. This factor will be different depending on what foam you are installing. The conversion factors below have taken into consideration a factor of compression and a margin for error.
- RR201 – 100 lb/yd3
- RR401 – 120 lb/yd3
- RR501 – 145 lb/yd3
- RR601 – 170 lb/yd3
- Rate - How much to charge per unit.
- Mudjacking - /yd3 (Price per cubic yard)
- Polyurethane - /lb (Price per pound)
Multiple options can be added or removed, they will be on every estimate created using the Add on. If options are deleted it will not affect previously created estimates that used that option.
Using the Concrete Section in an Estimate
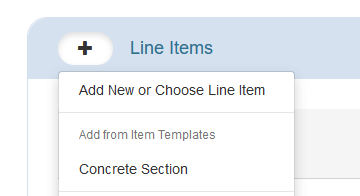
To use the Concrete Section add on, open a project and select the green + button in the Line Items section of a project and select Concrete Section.
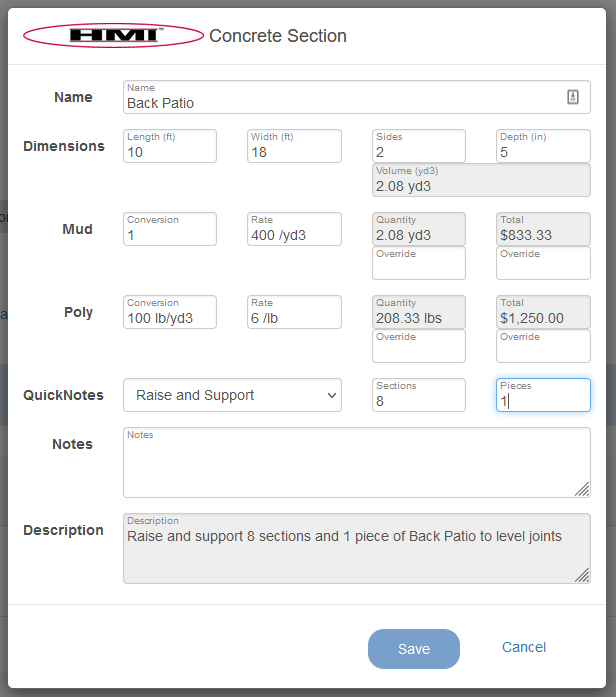
- Choose an identifier for the area you are estimating in the ‘Name’ field.
- There is currently a list of areas that will be pre-populated as you start typing.
- If you have any area you would like added to the list, please submit your request to Estimate Rocket Support
- There is currently a list of areas that will be pre-populated as you start typing.
- Enter the length and width of the area you are estimating.
- This will not typically be based on each individual slab, but an overall effected area.
- It will be based on an individual slab if only one slab is affected.
- This can be general dimensions and should be rounded up if not in exact feet.
- This will not typically be based on each individual slab, but an overall effected area.
- Enter how many sides are settled.
- Enter 1 for sides settled
- This means the settlement is only in one direction, water would run down the slab in that direction
- If the slab is settled more along one side than the other, enter 2.
- Enter 2 for 2 sides settled
- This means if water was on the slab it would drain towards a corner and not along one edge.
- Enter 3 if the entire slab is settled. (Note: there are four sides settled when a slab is completely settled. Entering 4 will cause an error in the program)
- When in doubt if it is one or the other, choose the higher number. It is better to bid higher than to bid too low.
-

- Enter 1 for sides settled
- In the ‘Depth’ Field enter how far the slab has settled.
- If it has settled more on one side than the other, choose the lowest point.
- In a void filling applications the depth will be considered how deep the void will go.
- The calculated volume will be populated in the grey field as cubic yards.
- The type of foam you are bidding can be different than the default. Editing this on an individual estimate does not affect other estimates or the default.
- To edit, update the ‘Conversion’ and/or ‘Rate’ field to the foam you are bidding or the rate you want to charge.
- RR201 – 100 lb/yd3
- RR401 – 120 lb/yd3
- RR501 – 145 lb/yd3
- RR601 – 170 lb/yd3
- If void filling and not lifting more conservative numbers can be used.
- RR201 – 70 lb/yd3
- RR401 – 110 lb/yd3
- RR501 – 140 lb/yd3
- RR601 – 165 lb/yd3
- If void filling and not lifting more conservative numbers can be used.
- To edit, update the ‘Conversion’ and/or ‘Rate’ field to the foam you are bidding or the rate you want to charge.
- All calculated values can be edited. These vies are the ‘Volume’, ‘Quantity’ and ‘Total’ gray fields.
- Type the new value in the ‘Override’ field below the quantity or total field. This will automatically adjust the other field affected. Only one override is available between the ‘Quantity’ and ‘Total’ fields in each section.
- Quick notes describe the type of work you are doing. This can be left as none or changed to ‘Void fill’ or ‘Lift and Stabilize.
- Choosing one of these options will populate the text in the ‘Description’ Field.
- When a selected, two new fields will appear to add the number of sections and pieces being estimated on this line item
- A ‘Section’ is a complete slab of concrete
- A ‘Piece’ is a portion of a complete section that has cracked
- A section broken in half would equal two pieces.
- When a selected, two new fields will appear to add the number of sections and pieces being estimated on this line item
- Additional notes can be typed in the ‘Notes’ field. These will be added to the end of the ‘Description’ content.
- Choosing one of these options will populate the text in the ‘Description’ Field.
- The ‘Description’ Field is auto populated from previous fields. It will include the Quick Note descriptions that was chosen, the number of sections and pieces you entered and the name of the section chose. It will also include any notes added.
- Click ‘Save’ to complete the entry.
- If multiple options were completed, they will be added as Groups. Groups can be deleted or edited.
- Line items within a Group can also be edited or deleted
- Deleting a Concrete Raising section within a line item will also delete this sub item from other groups.
- Line items within a Group can also be edited or deleted
- When multiple sections have been completed, they will appear as additional line items under other groups that have previously be created.
- For more information on Groups, go to : https://support.estimaterocket.com/estimating-and-invoicing/line-items
- If multiple options were completed, they will be added as Groups. Groups can be deleted or edited.