Estimate Rocket can automatically send your new invoices and new payments to QuickBooks online using Zapier. Zapier is a bridge between Estimate Rocket and QuickBooks and can also be used to connect your account to other third party services as well. The setup process is broken into three parts:
1.) Connect Zapier to Estimate Rocket.
2.) Setup sending New Invoices to QuickBooks.
3.) Setup sending New Payments to QuickBooks.
IMPORTANT: Before starting this tutorial, create a test project in your Estimate Rocket account along with an invoice and payment for that invoice. This information will be used to test the Zap.
Connect Zapier to Estimate Rocket
1.) Goto https://estimaterocketapi.com/ and login with your Estimate Rocket account owner login. Leave this tab open during the setup process.
2.) Login to your Zapier account, or create a new account here: https://zapier.com/pricing/. You will need the "Starter" plan to use Zapier with Quickbooks.
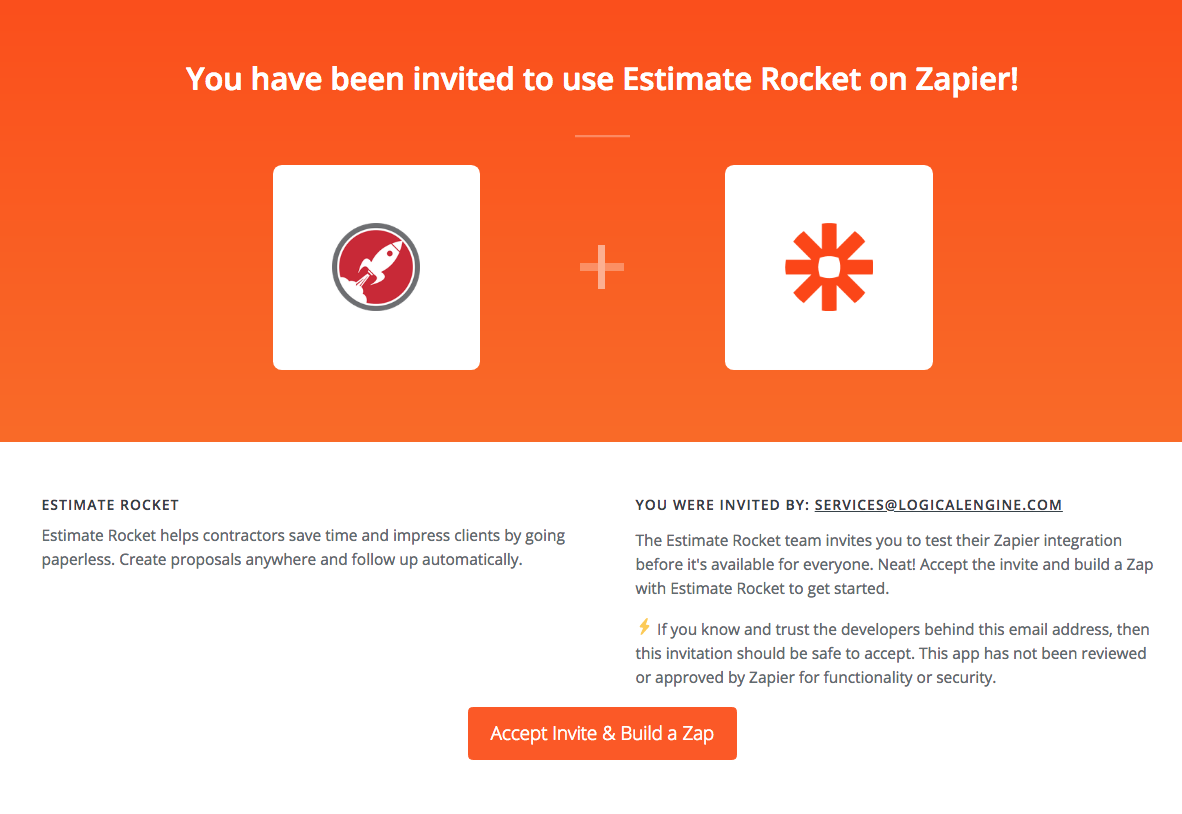
3.) Click this link to connect your Estimate Rocket account with Zapier: https://zapier.com/developer/public-invite/150116/97091d454546e3ac6b960f638f82be35/
When the confirmation dialog appears, click the Accept Invite & Build a Zap button. This will connect Estimate Rocket to your Zapier Account. After completing this move onto the next section to create your first Quickbooks Zap.
Setup Invoice syncing to QuickBooks
1.) Click Create This Zap button or the orange Make a Zap! button in the top menu.
2.) Search for Estimate Rocket in the search bar and select it.
3.) Select the New Invoice trigger and then click Continue.
4.) Select Connect an Account, login to your Estimate Rocket account and then click Authorize.
5.) Select your Estimate Rocket account, click Test, then click Save + Continue.
IMPORTANT: Be sure you have created a test project with an invoice in Estimate Rocket before continuing. Zapier will use this invoice as test data during this setup process.
6.) Click Find Data.
7.) Select the invoice you created for this test then click Continue.
8.) Select the Your Zap currently lacks an Action step. Add one now! link.
9.) Search for Quickbooks and select it from the dropdown.
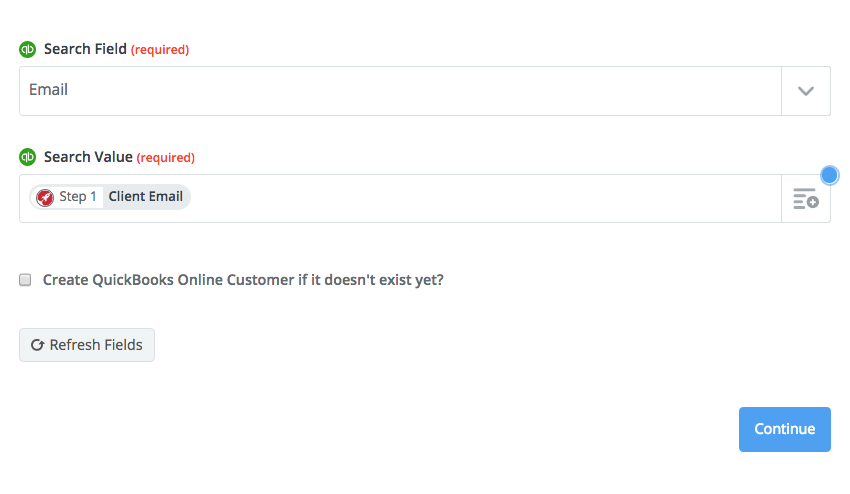
10.) Select Find Customer then click Save + Continue.
11.) Click Connect an Account then click the Yes, Continue button.
12.) Sign in to your Quickbooks account and then click Connect.
13.) Test the connection then click Save + Continue.
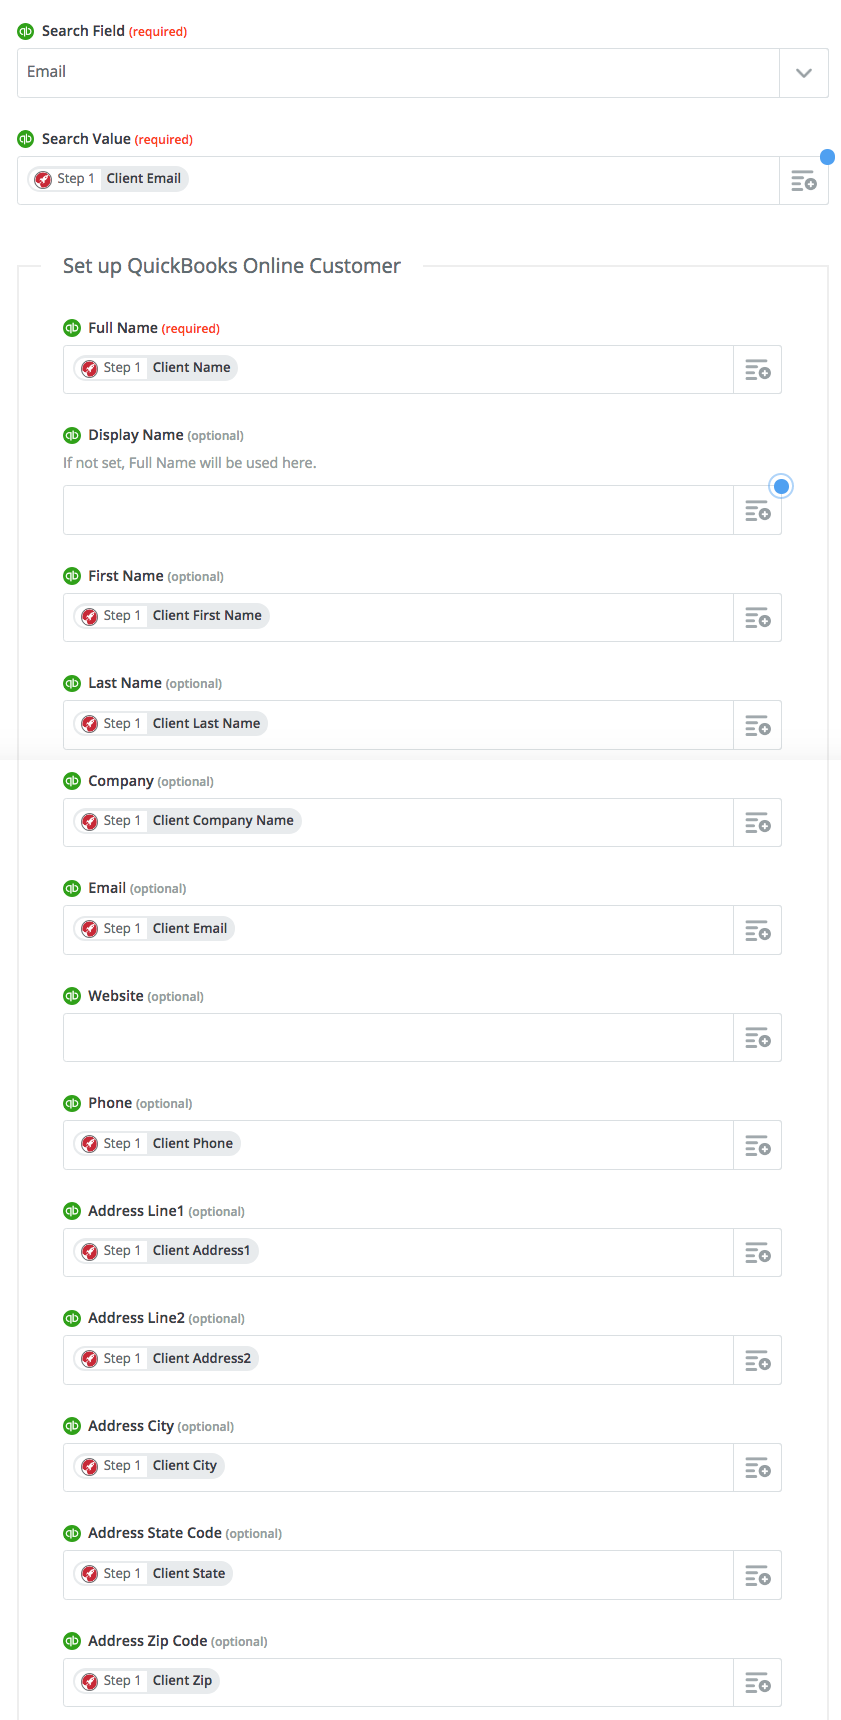
14.) Be sure and check the Create QuickBooks Online Customer if it doesn't exist yet? Checkbox.
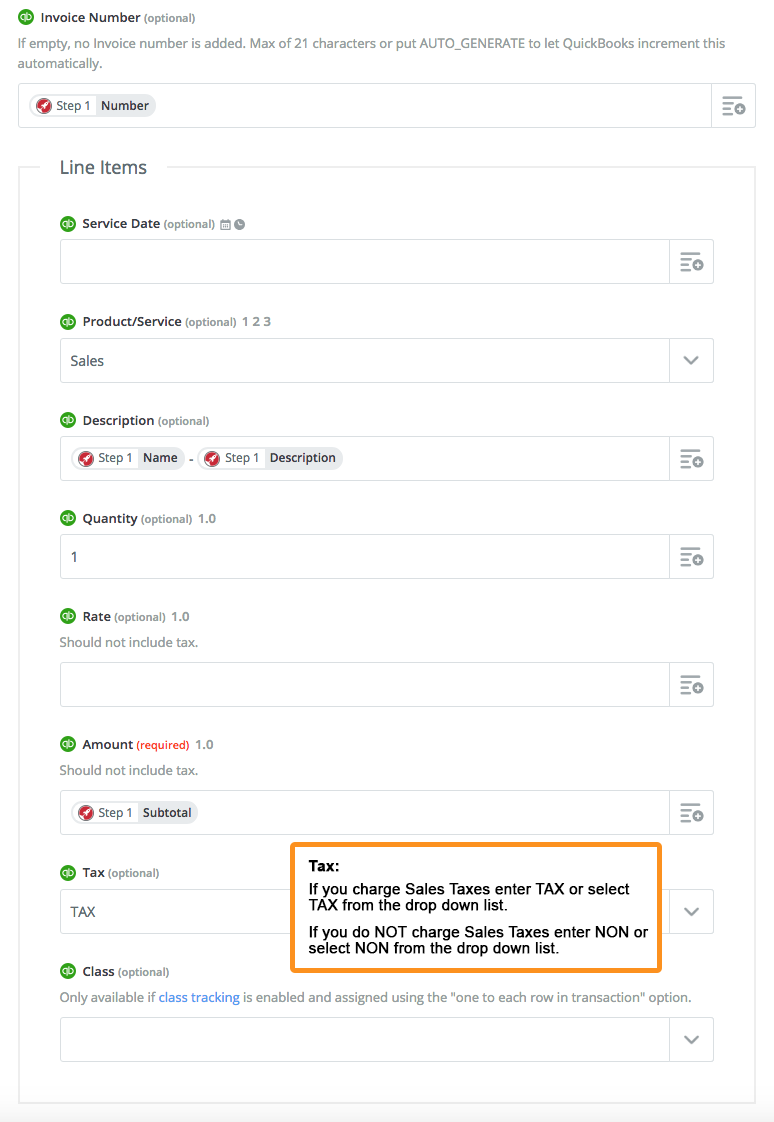
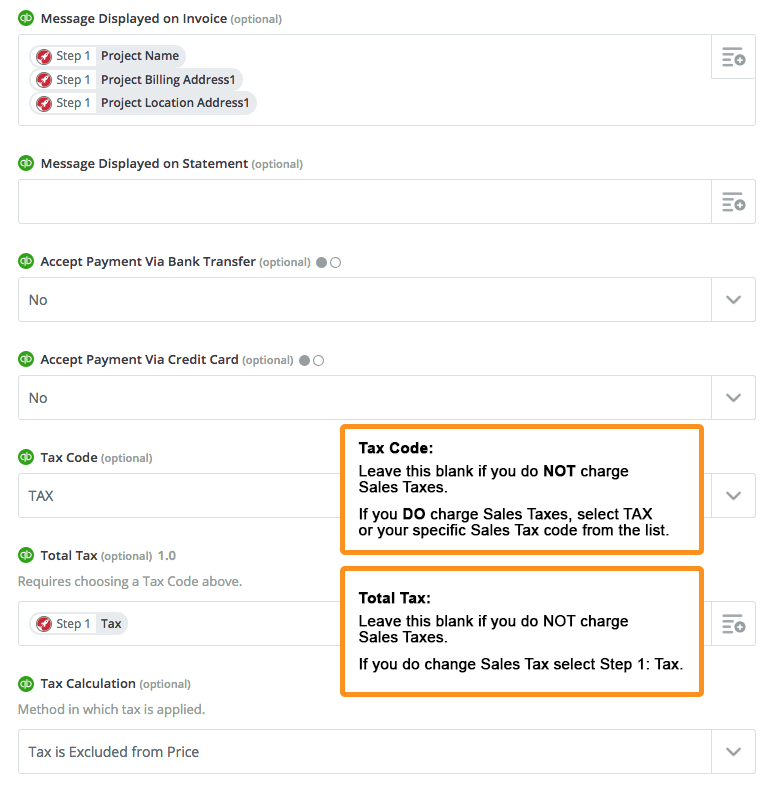
15.) Continue the field mappings as shown below and click Continue when finished.
16.) Review the information and click Fetch & Continue.
17.) If the test is successful, click Add a Step on the left hand side of the page.
18.) Start typing Quickbooks in the search box or just select the QuickBooks Online icon if its displayed.
19.) Select the Create Invoice action and click Save & Continue.
20.) Select your QuickBooks Online account and click Save + Continue.
21.) Map your fields as shown below.
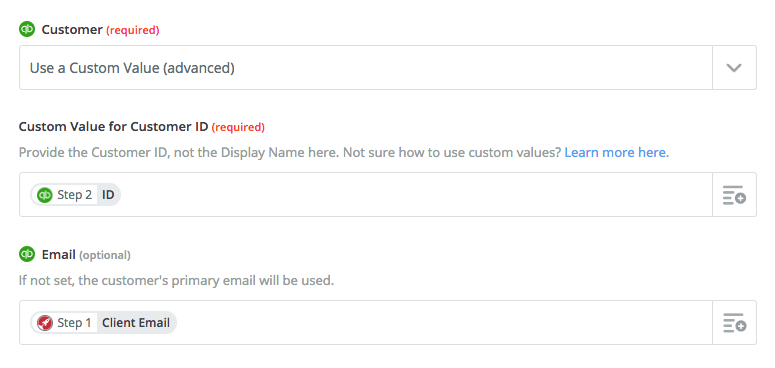
22.) Click Continue when finished.
23.) Test your Zap and if you get the Test Successful message, then click Finish and enable the Zap.
Your ZAP should now be setup and will start sending new invoices created in Estimate Rocket into you QuickBooks Online account automatically! Go to your QuickBooks account and check to make sure the text invoice went over successfully.
Setup Payment syncing to QuickBooks
1.) Navigate to your Zapier Dashboard and click the orange Make a Zap button in the top menu.
2.) Search for Estimate Rocket in the search bar and select it.
3.) Select the New Payment Trigger and click Save & Continue.
4.) Select your Connected Estimate Rocket account and click Save & Continue.
IMPORTANT: Be sure you have added a payment in the test project you made earlier before continuing.
5.) Click Pull in Samples, select the payment you made, then select Continue.
6.) Select Your Zap currently lacks an Action step. Add one now! link and then select QuickBooks.
7.) Select the Find Customer Action and then click Save + Continue.
8.) Select and Test your Quickbooks account then Save + Continue.
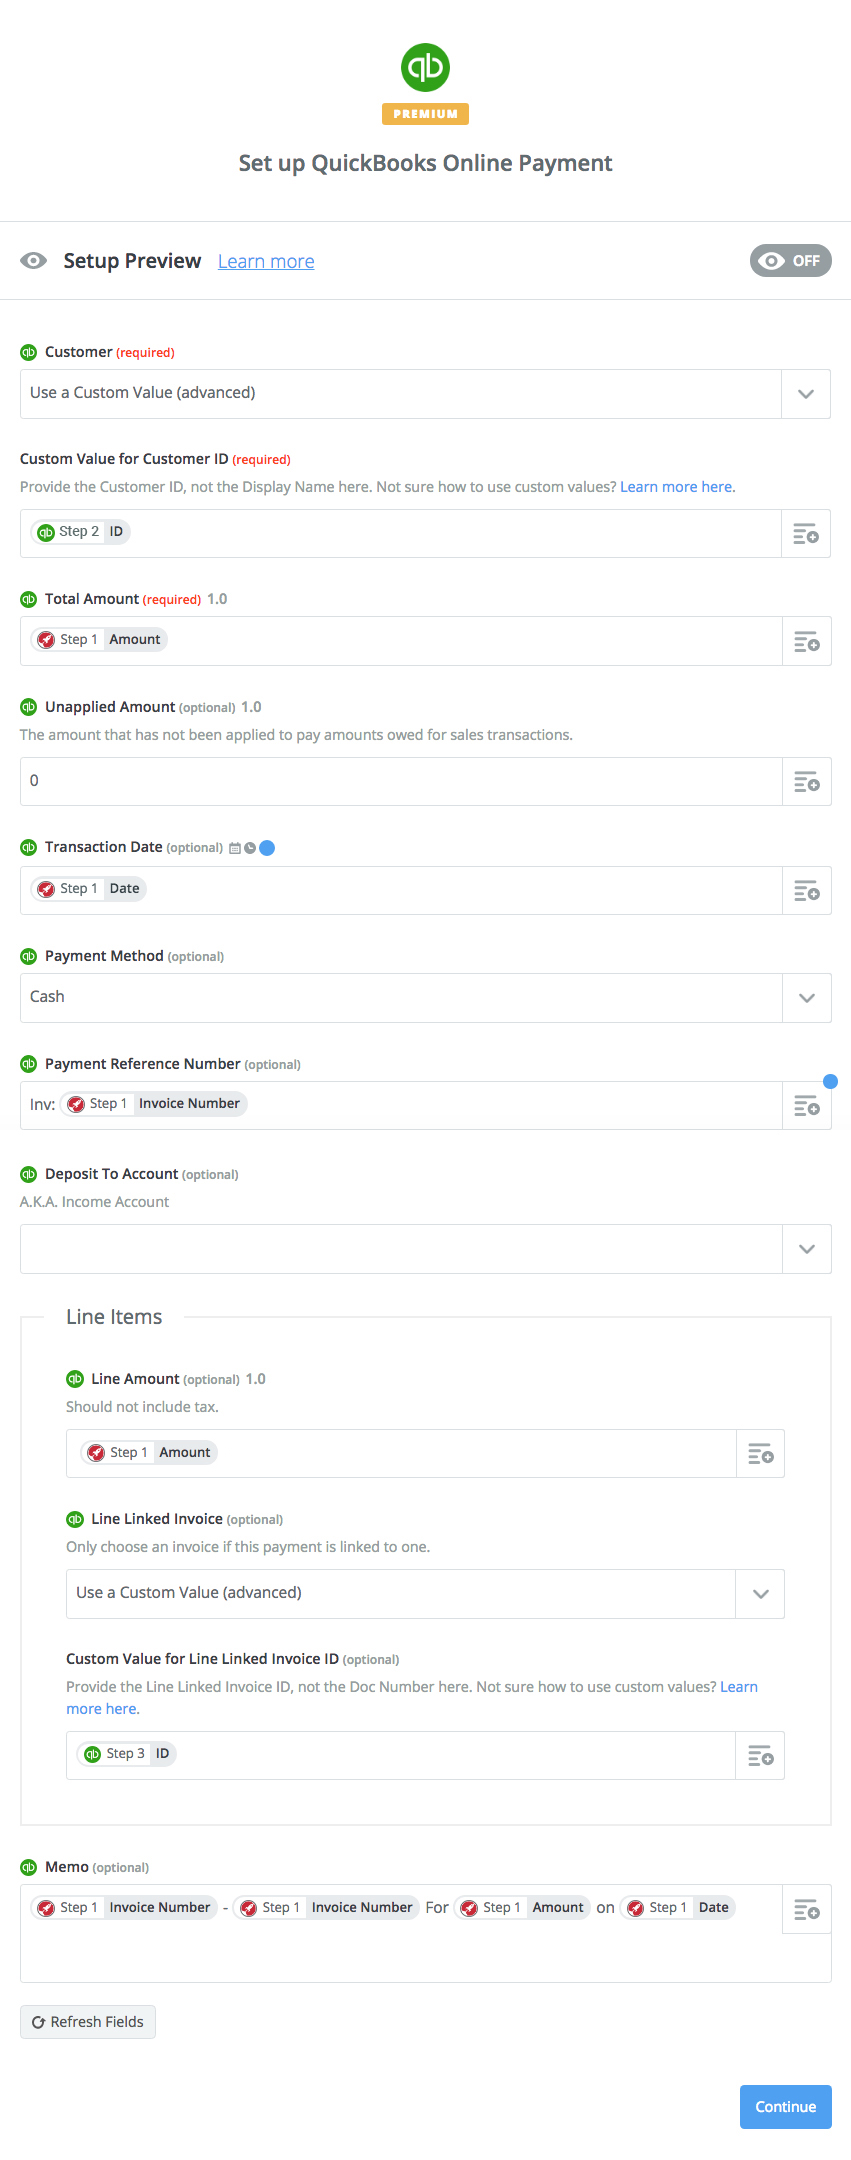
9.) Fill in the appropriate field mappings as shown below and click Continue when finished.
10.) Click Fetch & Continue to test.
11.) Click Add Step after the test.
12.) Select Quickbooks as the Action App.
13.) Select Show less common options, scroll down to the bottom of the page, then select Find Invoice then click Save & Continue.
14.) Select your Quickbooks account, Test it, then Save & Continue.
15.) Use the drop down list and locate and select the Estimate Rocket Invoice Number field and click Continue.

16.) Click Fetch & Continue to test.
17.) Click Add Step after the test.
18.) Select Quickbooks as the Action App.
19.) Select Show less common options, scroll down to Create Payment, select it, then click Save + Continue.
20.) Select your connected QuickBooks Online account, test it, and then click Save + Continue.
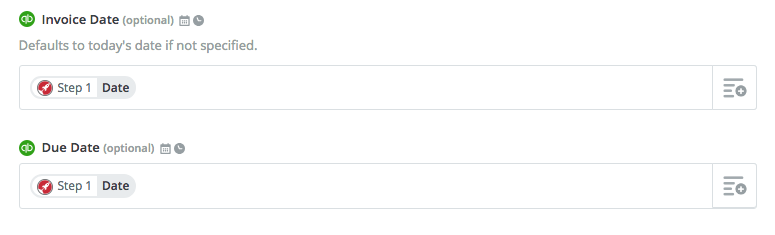
21.) Continue the field mappings as shown below and click Continue when finished.
22.) Click Continue when finished and then Send a Test to Quickbooks Online.
23.) If the test is successful, select Finish, give this zap a name, then turn the Zap on.
Your Zap should now be active and as you enter payments into Estimate Rocket they will be Zapped to your QuickBooks online account. Check to make sure your test went through and is associated with the same invoice that we tested earlier. If you have any problems with the Zap, the first place to look is the Task History option which will show you a history of all the zaps and will list any that did not Succeed.
Don't hesitate to give us a call or contact us through the intercom on the lower right corner of your screen!