Currently some of the Estimate Rocket monthly plans include multiple users for the single base price.
Take advantage by adding the new users right away! This will give you a feel for the employee to employee interactions and put you in a position to manage your company growth and control the chaos when you need those additional employees.
Adding employees to the system gives them a unique login allowing them to create and collaborate on projects.
1.) From the top menu, select Settings>Employees.
2.) Click + Employee to add a new user to the system.
3.) Select whether this is a Full User or a Field User.
..if you are adding a Field User please do Step 5 calendar color selection before selecting Field User
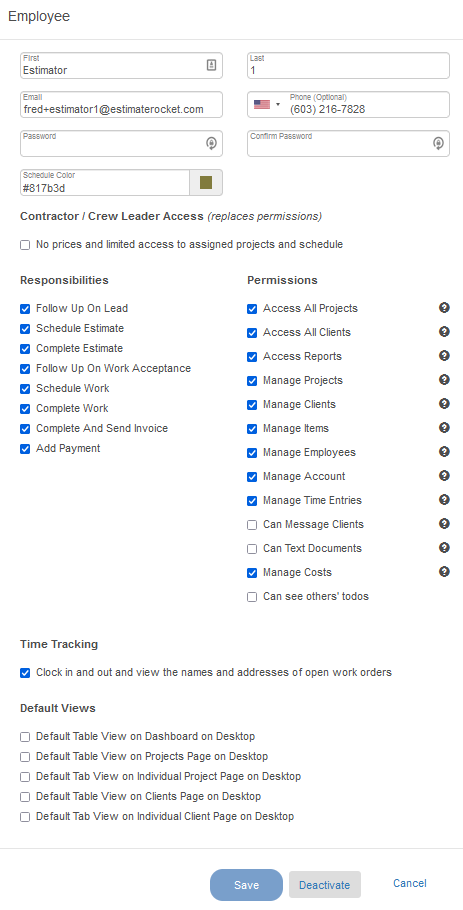
4.) Enter the employee’s: First Name, Last Name, Email, Phone Number, and Password.
5.) Choose a Calendar color for the user.
6.) Choose whether this is a Contractor/Crew Leader user.
7.) Choose the Responsibilities and Permissions the user will have.
8.) Choose whether this user can clock in and out using Time Tracking.
9.) Save when finished.
Responsibilities
Determine which work states employees are allowed to be assigned to.
For example: When an employee has the Schedule Estimate responsibility checked, they can be assigned to the Schedule an Estimate project step.
Unique Email Address
In Estimate Rocket new users must have a unique email address. Now perhaps as users are being added there are not any ‘spare' email addresses lying around to do this with. Some email servers will respect a + in the email address where all messages are sent to the base user.
There will be many examples of this visible in the associated help pages.
For example:
Lets say that fred@estimaterocket.com was my main email address.
fred+estimator@estimaterocket.com is a legitimate email address for a user in Estimate Rocket and any email sent to that address would appear in the main fred@ mailbox.
You can test if your server works this way by sending a test email to one of the + email address to see if in lands in your main inbox.
When setting up assignments in a multi user system feel free to use the + strategy even if it is for the simplicity of keeping your estimates and work orders appearing as distinct colors on your schedule page.
Essentially an initial setup of:
fred@
fred+estimator@
fred+projectmanager@
Is a great starting point to get a feel for the power of how Estimate Rocket seamlessly hands off assignments to different users and how those display on the dashboard and schedule pages.
Permissions
Determine what the employee can view and have access to change.
For example: If you want an employee to only see projects that are assigned to them, then you would un-check the Access All Projects and Access All Clients check boxes.
Permissions beginning with Manage (Manage Projects, Manage Clients, etc) should only be granted to trusted employees.